4 Things to Automate Using Dubsado and Zapier Integration
We all know how much we love Dubsado’s workflows (so much so that we wrote a whole blog post about them, which you can check out here). But what you may not know is that, although their native workflows serve tons of amazing actions, you can take your automation game one step further by integrating with Zapier.
We’ve been around the block with Zapier a few times, so much so that we could dub ourselves Zap experts, and we’ve thought of more ways that you can take Dubsado to the next level! Keep reading to learn 4 more things you can automate using the Dubsado and Zapier integration.
Dubsado Steps and Triggers
There are multiple ways to use these powerful tools together. Before we tell you the ways that we’ve come up with, we thought it might be useful to list all of Dubsado’s triggers and steps in case you notice a few ways you can use it yourself for other things! At the moment, there’s only one step, which is “Create new project”, but there are 5 triggers that can lead into other actions:
Contract signed
Project status updated
New payment received
New project as lead
New project as job
Add Leads to a Spreadsheet
Hey, fellow spreadsheet lovers! Sometimes you just want to have a trusty ol’ spreadsheet database of leads in case the tech gods decide to fail you. Adding leads to a spreadsheet will allow you to make sure they’re in a safe place in a simple format. This could also be useful in case you have a VA or someone working for you whom you don’t want to give access to your Dubsado account, yet they need to help you keep track of your leads.
For this one, you would use Dubsado’s trigger function of “New project as lead”. From there, you can choose Google Sheets to create a new row or column with the project’s first name, last name, and email address.
Create New Projects from Other Apps
Perhaps you have another tool or software that you use to collect leads and streamline the client process. If you’ve been having conversations in your DMs, for example, you could add that person to a spreadsheet. From there, you can do a little reverse action and instead of adding leads to a spreadsheet, you would create a new project from the row data.
There are tons of data options for this step, depending on how much info you capture from your leads. You have the option to automatically input:
Project location + address
Alternate contact info
Client location + address
Company name, email, and phone number
Client name, email, and phone number
Project status
Project source
Title of project
Start and end dates
Mapped fields
You’re also able to trigger a workflow from this lead as well, if applicable. Although you have all of these options, the only required fields are project title and the client’s email address, so don’t feel pressured to gather all of this information right off the bat!
Add Leads or Tasks to Your Project Management System
As much as we love Dubsado’s task lists and boards, you may prefer to use a more robust project management system. You can connect Dubsado to tools like Trello, Asana, and ClickUp to streamline your processes even further. With Trello, for example, you’re able to create a new board, list, card, comment, label, and tons more. Let’s say you have labels for clients that have yet to pay. With Dubsado’s trigger action “New payment received”, you can update that label in Trello.
As another example, let’s say you have a project status in Dubsado for New Inquiry. While we’d usually recommend creating a todo in their native workflow feature to follow up, you could instead add this task to Trello.
Add Leads to Your Email List
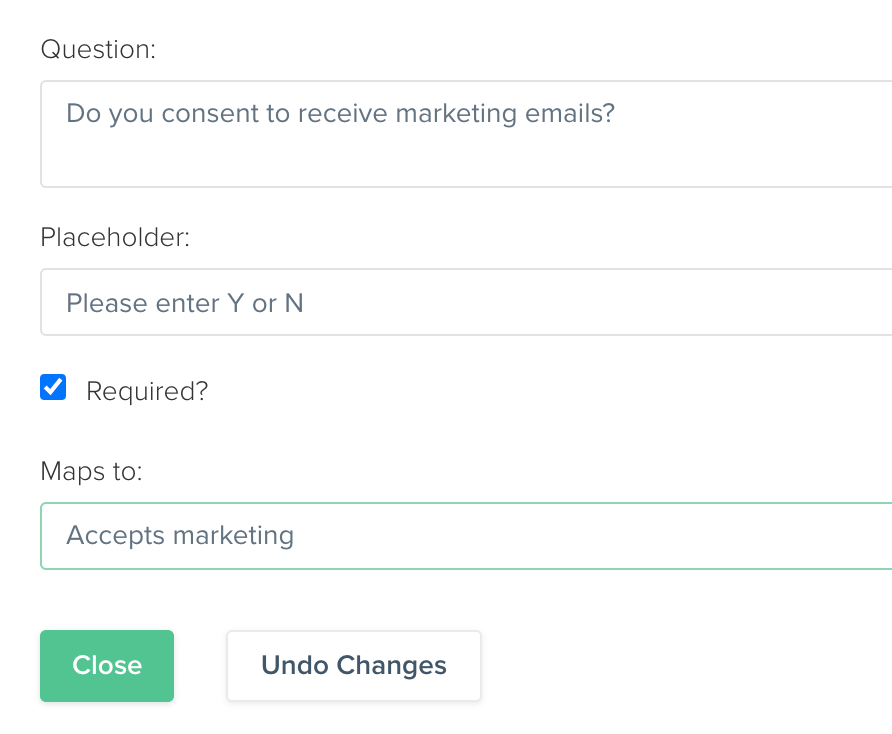
Setting this one up can be a little more tricky, but only because it requires a few more simple steps in Dubsado. For this, you’ll need to create a custom mapped field named in Dubsado under Settings (gear icon) > Custom-mapped fields. You can name it something like “Accepts Marketing”. At the moment, you’re only able to choose a short answer response or date select, so choose the short answer response.
Now you’ll need to add a marketing consent field to your lead capture form. This will have to be a short answer response, so you can ask them to enter either Yes/No (or Y/N to keep it even shorter). From there, under the “Maps to:” field, you’ll find and select the field you just created.
This will be a three-step Zap:
Dubsado trigger “New Project as Lead”
Filter by Zap to ensure that Custom Mapped Field: Accepts Marketing contains Y or Yes
Create new subscriber in your email marketing service
And there you have it! Those were four more ways we could think of to take your automation game to the next level using Dubsado and Zapier’s integration. We’d love to hear about more ways you’re using this integration in the comments below!