6 Steps to Master Holiday Facebook Advertising
‘Tis the heart of the retail season and if you’re a business owner with the perfect gifts to sell, now is the best time to leverage Facebook’s advertising platform to reach more customers and drive more sales. Because who doesn’t want to make more money, right?!
So, if tackling Facebook advertising in the middle of the holiday shopping season seems overwhelming, don’t worry. We’ve put together a quick 6-step guide to walk you through the process.
Being the savvy business owner that you are, we’re going to assume you have a Facebook business page and Instagram account. If you’re just getting started, you’ll need to create these before jumping into the advertising arena.
One of the great features of the Facebook’s Ad Manager is being able to manage both Instagram and Facebook ads all from the same place. If this is your first time setting up an ad, you will be prompted to put a credit card on file before you can run an ad.
Let’s dive into the 6 steps for creating successfully holiday ads:
Step 1: Marketing Objective
When creating an ad the first screen you see asks, “What’s your marketing objective?” This is a critical part of the ad set-up. I recommend planning your goals and what you are seeking to achieve with Facebook Advertising prior to getting started. This might include a list of products to feature or holiday sale offerings. For the purpose of this blog post, let’s assume we’re a retail store looking to drive online sales. In this case, we’re going to select the marketing objective of “Traffic.” This means we’ll be adding a link to our ads which will take customers directly from Facebook or Instagram to our online store.
When selecting the traffic consideration, be sure to name your campaign to easily track and identify the ad once it’s live. If you are sending people to a specific product, include that in the name. For example, HolidayCoffeeMugs_Traffic.
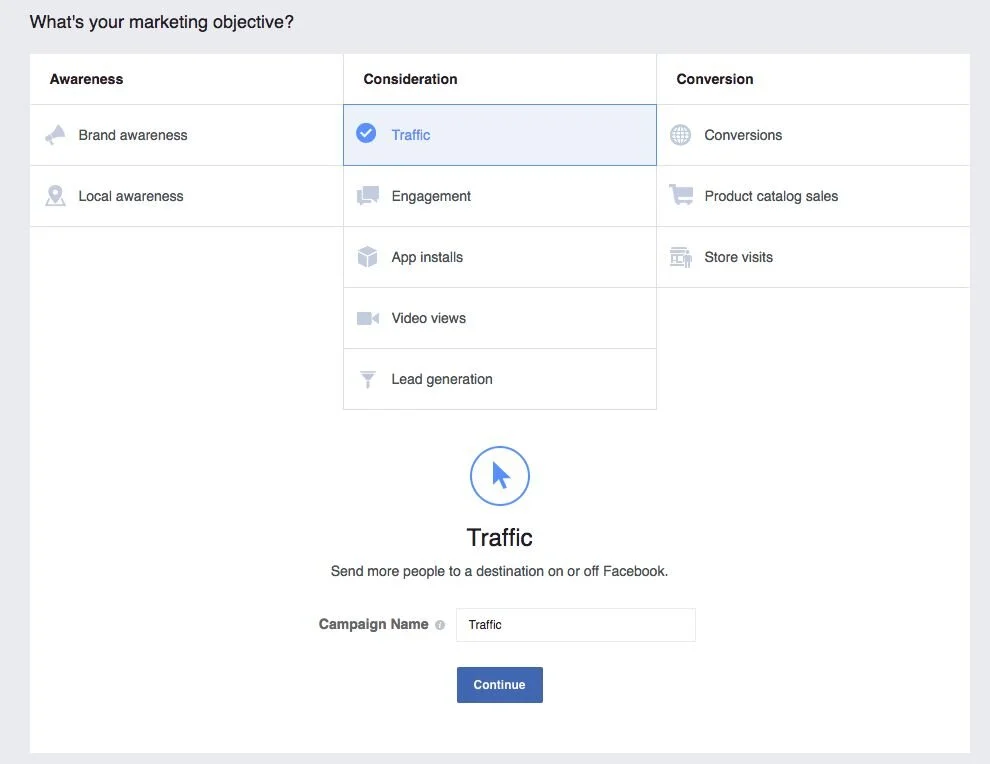
If you’re not sure which objective to select, ask yourself this question, “As a result of someone seeing my ad, what action do I want them take?” Do you want them to like, comment, share, click-through, or watch a video? This will help you decide which is objective is right for your ad. Of course, if you’re looking to achieve multiple objectives, then set-up an ad for each goal and track and manage separately.
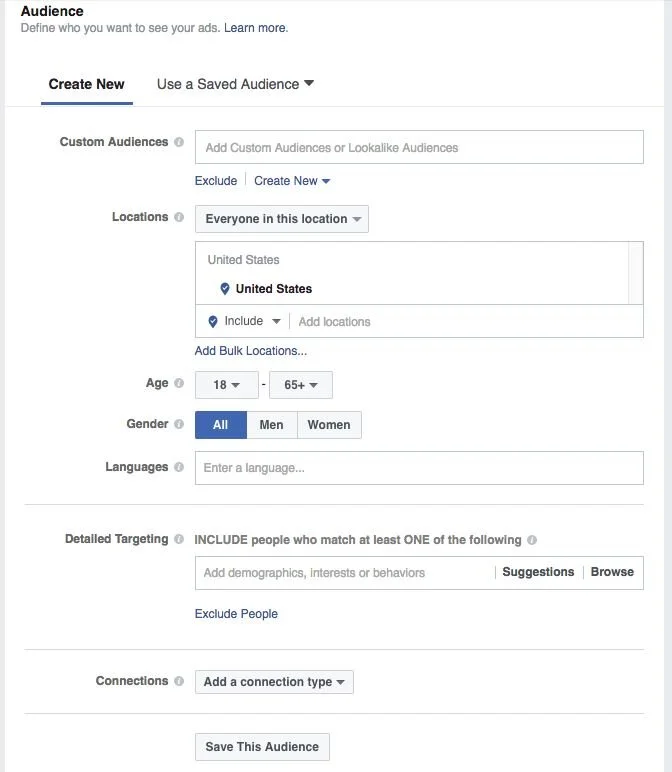
Step #2: Audience Targeting
Now that the ad objective is dialed in, it’s time to target who we want to see the ad. Identifying a target audience is where the magic happens with Facebook advertising. Again, as a savvy business owner, you most likely have a strong understanding of who your target audience is, but if you don’t have the demographics and shopping behaviors outlined prior to setting up your ad, it might be worth pausing here to make a list of what your ideal customers look like.
One of the great features of creating audiences is that you can save them when you use again later - such a time saver!
When creating an audience for your ad, you can define the group by location, age, gender, languages spoken, detailed targeting (which we’ll get into in a moment), and connections. The connections allows for targeting people who already like your page or you can exclude them, depending on your goals. I recommend that if you are trying to target folks who already like your page, do not complete the detailed targeting section. The detailed targeting section works best to target a specific audience. The people who already like your page will most likely also fall within the parameters of your detailed targeting.
Step #3: Detailed Targeting
Just as identifying your marketing objective requires some additional thought, so might your detailed targeting segments. To get started, select the “Browse” option. A number of categories populate. Here you can select the best parameters to reach your ideal customers. You can drill down by interest (hello, shopping and fashion interests!) behaviors, job titles, demographics, etc. You can even specify an income level. This is very helpful if you sell luxury goods or items where you know that your target customers have a large disposable income.
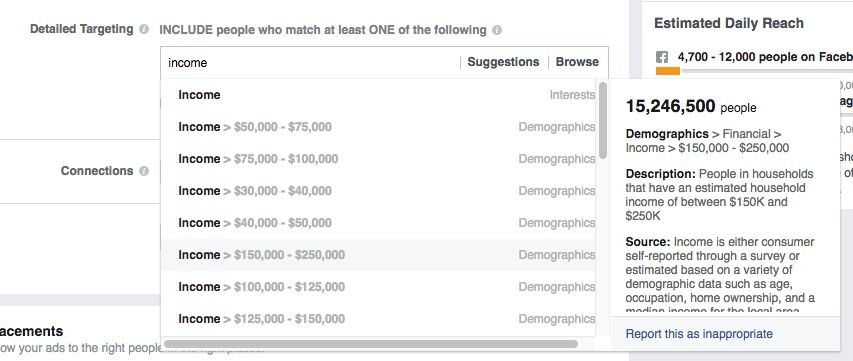
As you start to populate the detailed audience requirements, an audience definition meter to the right will show your overall potential reach and daily reach on both Facebook and Instagram. This will also tell you how broad or specific your ad is. Keep in mind the broader your audience, the quicker your budget may be spent trying to reach the large group. Likewise, an audience that is too specific may not reach enough people to maximize results. Select enough parameters that keeps the meter in the green portion of the spectrum. This may mean making some adjustments to the detailed targeting segments to reach an ideal number. You can always make adjustments once the ad is running but aim for an obtainable potential reach to start.

Another tip while setting up your targeting segments is to use the “Narrow Further” feature. For example, the Interest in Online Shopping has a potential reach of a potential reach of over 939 million people - that’s huge! Within that group you may be looking to only target those who have an interest in clothing or fashion accessories. This will reduce the potential reach and better target those with an interest in your type of product.

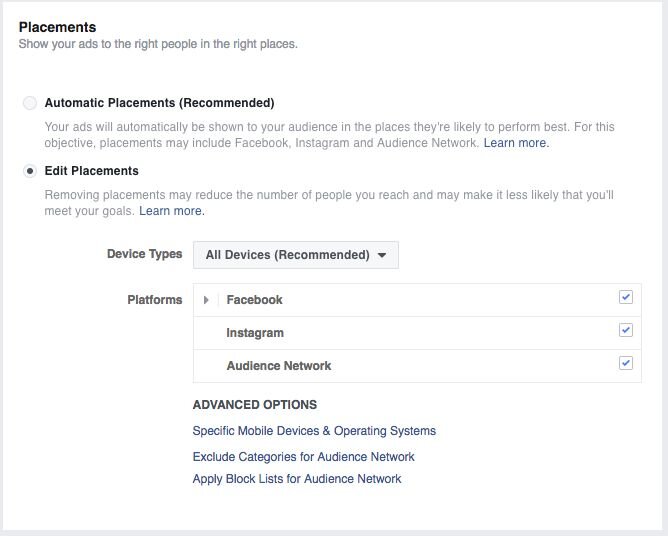
Step #4: Placement
With your marketing objective and audience defined, it’s time to select where you want to ads to be displayed. Select either Facebook, Instagram or both. Depending on your selected placement you may be eligible for the Audience Network. I, personally, haven’t used the Audience Network as this is a newer feature which targets audience outside Facebook, primarily on apps. If this is something you are interested in, you can learn more about it here.
Additionally, you can target those on specific devices or operating systems. Note that in order to push your ads to Instagram you have to include mobile devices.
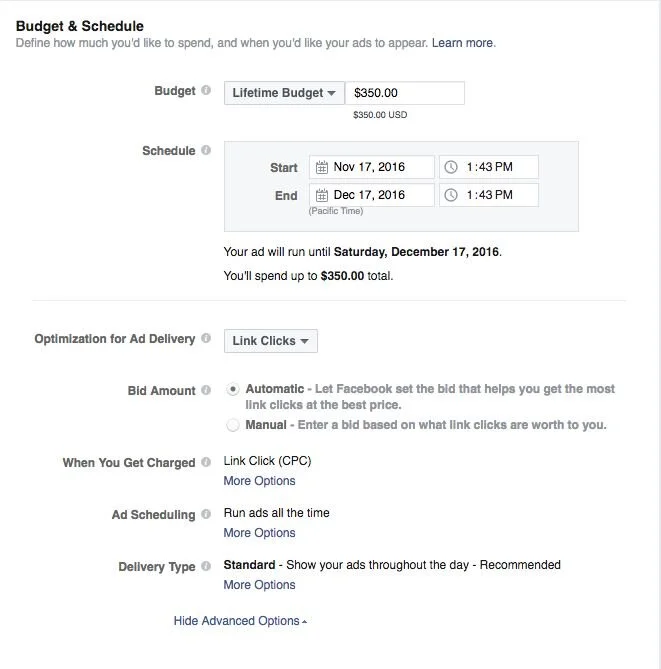
Step #5: Budget & Schedule
Next, it's time to set when your ad is going to run and how much you plan to spend. We recommend setting a lifetime budget and a standard delivery which allows Facebook to maximize showing your ad throughout the day to your target audience. Be sure to set your start and end dates for the campaign and verify the optimization matches your marketing objective. In this case, it would be “link clicks” to drive customers to your website.
Step #6: Get Creative
Now it's time to get creative! There are two ways to set-up the creative side of your ad. One is to use an existing post from your page. In order to do so, just select the “Use Existing Post” and this will allow you to select the specific post to be applied to your paid campaign.
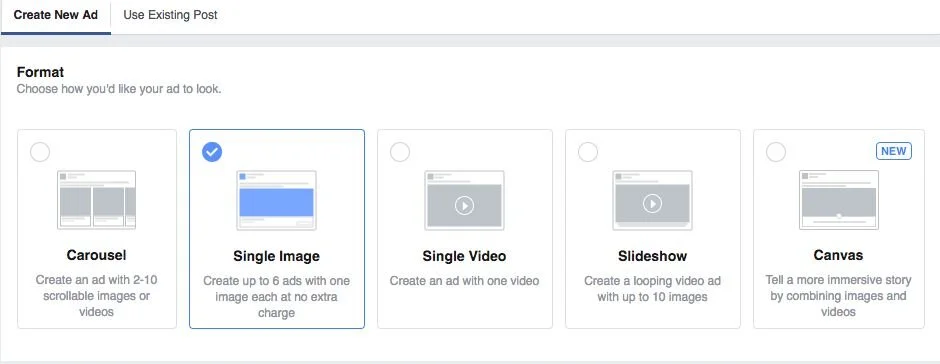
In this example, we’re going to stick with the single image ad promoting the purses in our online store. Facebook has free stock images available but I strongly recommend uploading your own imagery in line with your brand. Include a logo or call-to-action on the image. Just remember that Facebook only allows up to 20% of the ad image to contain text. If you’re not sure what percentage your copy covers, use Facebook’s overlay tool by uploading your image and using their grid to measure it.
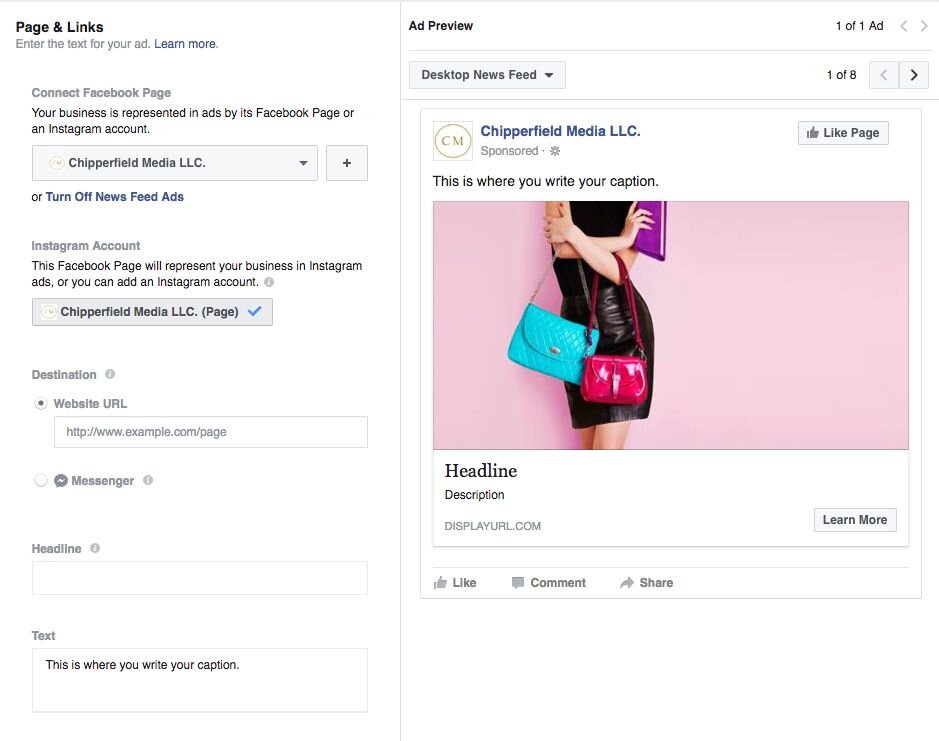
Once your image is uploaded, you can continue to build out your ad to include the product’s website URL, headline, description and call-to-action - there is even a “Shop Now” button, making it easy for customers to make a purchase. Remember, in our example, the objective to this ad was to drive web traffic. This means including a link to the correct destination page. Be sure the link sends customers to the product shown and not your website’s home page. The fewer clicks someone has to take to reach the shopping cart, the more likely they are to purchase.
Be sure to add a caption to your ad and a headline which stands out. Do note that many links when added will auto populate a headline and description. You are able to edit this to your desired copy, in this example the headline could read “Holiday Purse Sale.”
Now that you’ve created your ad you can scroll to the bottom and select “Place Order.”
Once approved, your ad will begin on the date and time you selected. Any time you visit the Ads Manager, you can monitor the results and make any edits to your target audience or budget as needed.
If you run your first ad and don’t see the results you desire, don’t give up. When starting with Facebook Ads, there is some testing that needs to be done to hone in on your target customers. Be sure to test different targeting segments and once you find the ones that works best, rinse and repeat for all your holiday product promotions!
We hope this guide helps you get excited about Facebook advertising for your business and helps you drive more sales this holiday shopping season!

ABOUT THE AUTHOR
Charlotte Chipperfield is the founder and CEO of Chipperfield Media LLC. Charlotte brings more than seven years of experience in marketing and has built a reputation as an expert and thought leader in the digital marketing space.
Prior to starting Chipperfield Media in 2014, Charlotte managed a number of sales teams and developed marketing and social media strategies for a number of Fortune 500 companies.She enjoys working with clients to drive increased customer engagement through creative and professional social media and digital marketing campaigns.
Working with business leaders to transpire thoughtful storytelling behind their brand, creating driven conversation and a healthier bottom line is what Charlotte finds most rewarding.
Charlotte Chipperfield, Chipperfield Media LLC
Instagram | Facebook | Pinterest | Twitter