How to Schedule Social Media Content using Post Planner
When it comes to social media schedulers it seems that it’s usually a bit of a piecemeal to get all the functionality you need for your business. The terms of service for each platform varies so much that it’s hard for one scheduler to be an “all-in-one”. So, while we still use and love Later for our Instagram scheduling, we haven’t really been in love with our options for posting to Twitter and our Facebook group.
When we were voicing our frustrations with our options someone in a Facebook group suggested we check out Post Planner. Holy Moly, were we impressed! First off, it’s $2.00 a month cheaper than what we were using (#DollaBills y’all) and it had some unique features that we didn’t even realize we were missing. If you’ve been considering Post Planner or if you already have it, but not quite sure how to use it, then read below for a full tour of our favorite features.
WHAT THE HECK IS POST PLANNER?
And more importantly, why do you need it? Social media can be tricky, and it’s hard to be active on all the platforms during the day without it sucking up your entire calendar. So it’s nice to have your posts scheduled out in advance so you stay on top of your social media game. Heck, anytime we can get a robot to do our work for us we’re going to do so.
Basically, Post Planner allows you to plan and schedule content to your Facebook Page, Facebook Group, and Twitter. Starting at just $7 a month for up to 10 profiles, 100 posts per day and 1000 planned posts it’s a clear winner over other apps like Buffer that cost $10.00 a month and only allow 100 planned posts a month.
We’ve been able to link our Twitter and Facebook Group so we can plan out content to our hearts’ desire, which frees up a ton of time on our part.
LET’S WALK THROUGH THE APP
First, you’re going to want to create your account. We chose to sign in with our Facebook information to make life easier, but you can create an account with your email (you’ll need to sign in to Facebook to connect your Facebook page or group though).

The first tab you’ll land on is the “Find” section. This one is both cool and lame at the same time. It’s cool because it lets you browse various categories such as “marketing”, “business” or “quotes” and related articles or statuses will pop up. We use this feature solely to get ideas on what to share, write ourselves, or just for inspiration. We don’t share these actual articles because we don’t know who they’re coming from. We like to support people we know in real life (even if just virtually) so we hope that they work on this section a bit. It would be nice to be able to load up accounts you actually follow to see what they’ve been sharing with the ability to re-post it within the app.
So you can skim over this section if you want to. We will point out though that the reason why this is neat and we hope they integrate it differently is that it’s super beneficial to share others’ content. It helps provide a smorgasbord of related and valuable content to your audience without it just coming from you. Sharing Karma is a real thing, y’all.

If you did feel inclined to share from this “Find” section, you would simply click on the article and up would pop your share box. We’ll go over more features of this share box below.
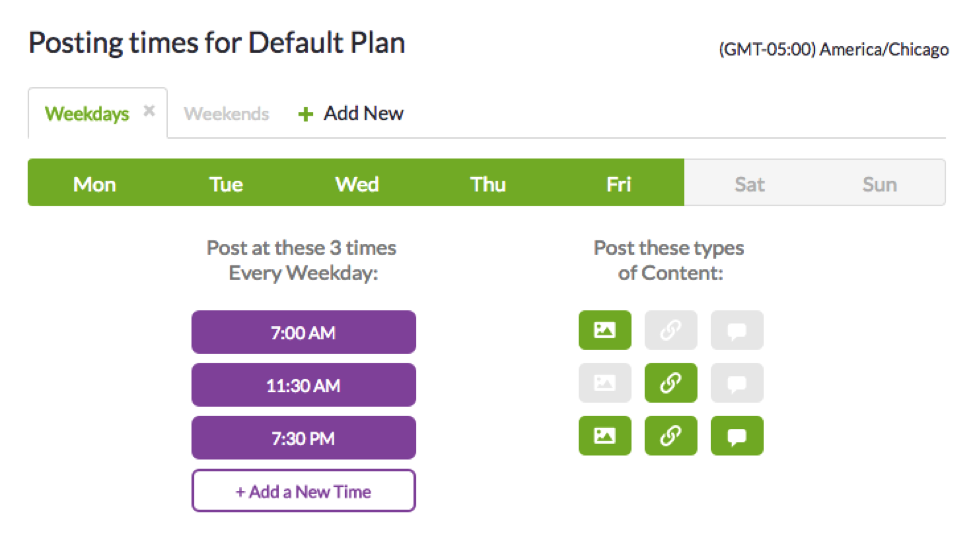
The next tab you’ll see is the “plan” section. You can set your default posting times in here if necessary. Say for instance you never want things to post on a Tuesday (weirdo) you would simply click on Tuesday to gray it out (similar to how Saturday and Sunday look). We chose not to set default posting time because we knew we were going to override them elsewhere. More on that below.
Okay, this is where it gets fun. Here is what our “Post” tab for our Facebook Group looks like. One of the features they have here, called the “Recycle”, is hands down the reason why we love this app. What it allows you to do is set a specific post to “Recycle” at a time you designate. We’ll show you how in just a bit. Here’s how that’s different than what Buffer can offer you. Say you want the same Facebook Group prompt to go out every Tuesday at 9 a.m. Well, in Buffer you could schedule in to do that once and save it to your library, but every week or so you’d have to drag it from your library to your Tuesday spot. If you placed too many of the same post (if you wanted to pre-scheduled out Tuesdays for the rest of the year for instance) Buffer would stop you. No bueno.
Another cool thing we want to point out is that if you click on the “Posted” tab you’re going to see all the things that have already gone out. From there you can click on previously posted items, edit (if needed), and repost. This is similar to Buffer’s library, but way more simple.
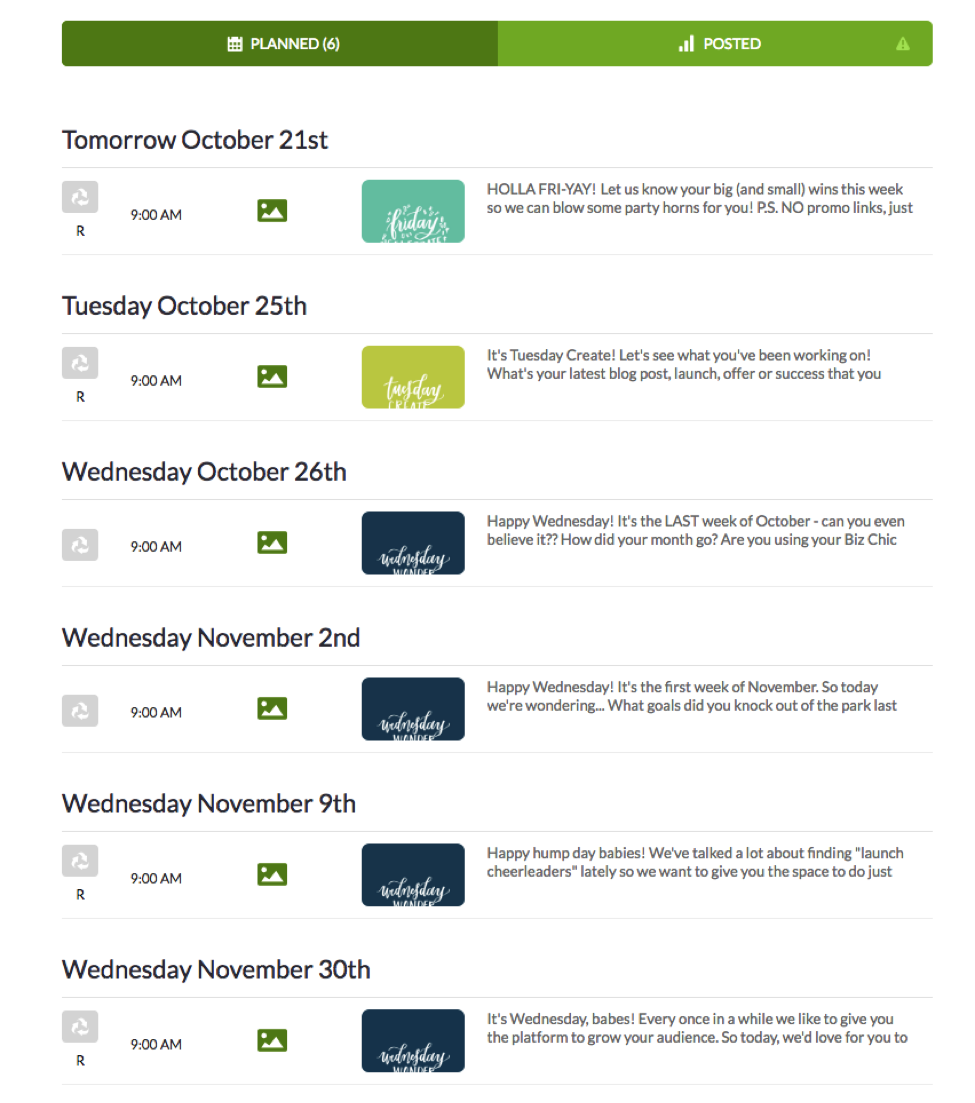
Here’s how our Twitter feed looks. You’ll notice that we have “Recycle” on every single post here too. What we were finding with Buffer is that since you could only pre-load 100 posts at any given time then we could only schedule so far in advance. That only lets you schedule 3 posts a day on Twitter per month (not counting if you have anything set to your Facebook Page or Group). Three posts a day on Twitter is not enough, folks, so we need more.
With Post Planner’s intro package you can have 33 posts a day on Twitter (whoa) or roughly 10 to 15 like we have because we also account for the posts we have planned in our Facebook Group (to reach their 1000 limit per month).

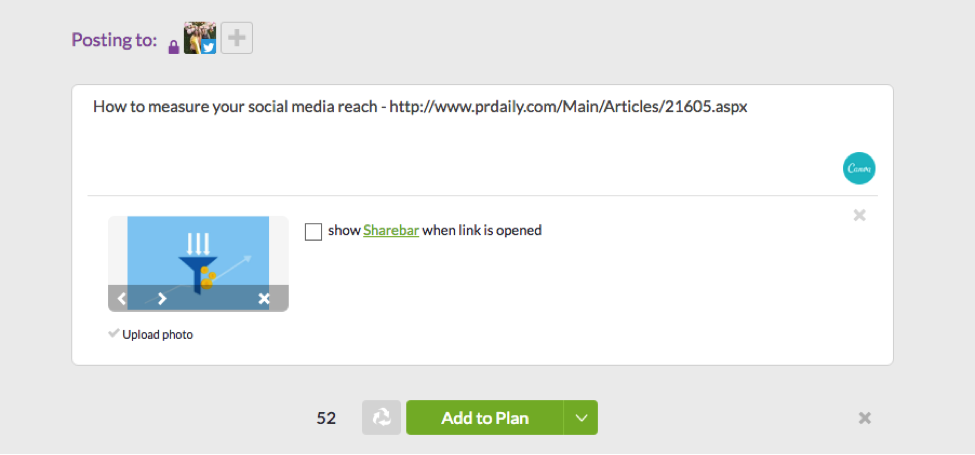
Here’s scheduling a tweet in action. We only plan for blog posts to be shared inside Post Planner. We have a IFTTT set up to post our Instagram posts to our Twitter as native posts (i.e. not an Instagram push, but a true Twitter post with an image). So we’re either sharing and repeating our own blog posts or the posts of people we love.
So here we’ve simply copy and pasted the direct URL to a blog posts of ours. Don’t worry about how long the link is, Post Planner automatically turns it to a bit.ly for you. The image that we have on our post automatically loads as the image to share (tweets with images perform better than tweets with just words). If we wanted to add more words we could, but we like to keep it simple (also, #Lazy).
You’ll see that we check “show Sharebar when link is opened” - we’ll go over that in a bit. Now, let’s plan this sucker.

If you click the “Add to Plan” it will pop this tweet up in the next open spot in your queue. If you click the drop-down arrow you’re going to get some more options.

From here you can decide to share as your next tweet no matter what is scheduled, share right now, or to schedule. When you open the “Schedule Post”, this is where the magic happens. You can set the exact time you want to schedule the tweet and select it to repeat if you wish. We select all of the blog posts we share to repeat, because we are very picky about what we share, so since we know it’s valuable we know you’re going to want to see it again.
Once you decide to repeat a post you can change it to repeat every # of weeks, days or months until a certain end date or for forever. WHOA. Think of all the possibilities! Once you pick your repeat plan just hit “Schedule”.

Now, your tweet will show up in your queue with the bit.ly that Post Planner gave it (feel free to make your own custom bit.ly in your bit.ly account, but this is just an extra step). You’ll also know that the “Recycle” is on because you’ll see the grey recycle icon on the left.

If you hover over the tweet, this purple bar will come up. This is your chance to edit, delete or re-schedule. You’ll only need to re-schedule if you didn’t select it to repeat forever.

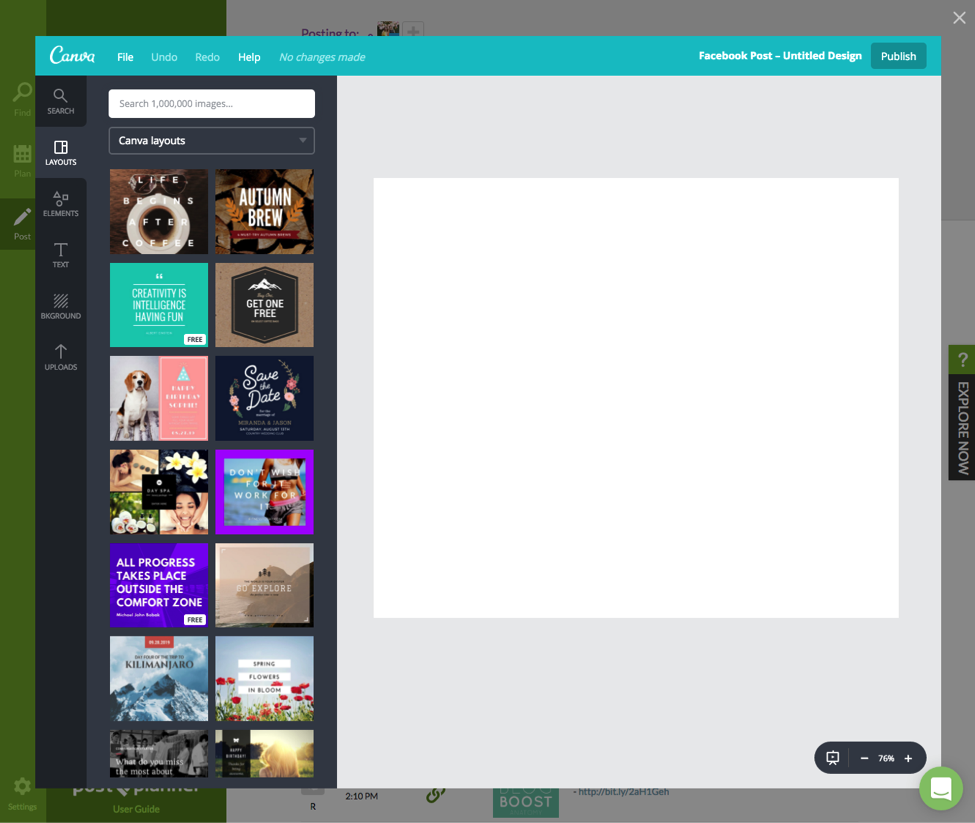
Oh, one other cool feature is that you can open up Canva directly inside the app if you don’t have a cute graphic to share. In-app friendliness is kind of our jam.
Okay, now let’s talk about what the heck the Sharebar was all about. It’s pretty much our favorite feature ever. So you know how when you share other people’s content you’d kinda sorta like to get them back over to your site too? Well, this is where Sharebar comes in. When you share a blog you can enable the Sharebar to show and this is what it’ll look like.

Here we are on Megan Minns’ website and our information is showing at the top of her webpage. It doesn’t block anything she already has going on it just simply reminds people who sent them there and enables them to head back to our website, Facebook, and Twitter account. If we wanted to show an email opt-in we would need to upgrade to the Guru plan at $15 a month (not bad at all).
In order to enable your Sharebar you have to create it first. You can find the information on how to do so in your Post Planner settings.

Whew! That was a lot of information. Your takeaways are this:
Post Planner is awesome
Sharing other people’s content is nice
Sharebar is totes cool
Scheduling this much content saves a buttload of time
We hope this walkthrough gave you some insight into how powerful this app can be for your business. Now get to scheduling, babe! Create your account with Post Planner now.