
Step-by-Step Guide to Creating Dubsado Proposals
Dubsado is an all-in-one CRM that allows you to do many many things right within the software. One of those things includes creating a variety of different forms, like proposals, contracts, questionnaires, and lead capture forms. Proposals are one of our favorite forms because when you send them, you have the option to make it an easy 3-step process for your clients where they can choose a package in your proposal, sign the contract, and pay the invoice all in three streamlined steps.
Sending them is easy, and creating them can be even easier. Dubsado has a drag-and-drop form builder that makes building your proposal a breeze, which we’ll be diving into later. So, keep reading for our step-by-step guide to creating Dubsado proposals!

Create Your Packages
First, you’ll need to create your packages so that you’ll have them to add to your proposal. You can find your packages in Dubsado’s main menu on the left hand side under Templates. When adding packages, you’re able to add items included, a description, the price, tax, discounts, and categories. Don’t worry about the items and description needing to be set in stone– When you add a package to a form, you’re able to edit that information to display differently if needed.
Create Your Imagery
If you need to create any sort of graphics to add to your proposal, now would be the time. We love adding graphics to our forms because it gives added branding and brings everything together cohesively and beautifully. You may want to create pretty graphics for:
Testimonials
Header and footer
Section headers (next steps, optional add-ons, kind words, packages, etc.)
Your process
Decorative photos
If you want to get access to Canva templates for these graphics, check out our Dubsado Proposal Templates in The Creative Template Shop! For just $47/month when you become a member, you can one-click add these templates to your Canva account and then add to your Dubsado account, easy peasy.
Build Your Proposal
So now we’ve arrived at the part where we actually put this all together in Dubsado. This can seem really intimidating, but Dubsado’s drag-and-drop builder makes it super easy! Inside their builder, they have different section types that you can drag and drop:
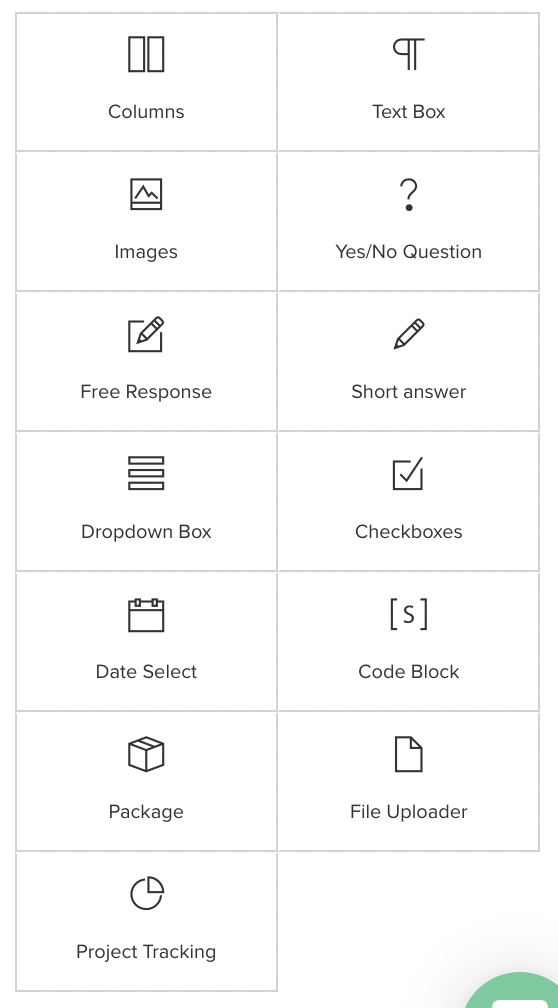
Columns - Add two, three, or four-section containers to fit other elements in a column layout
Text Box - Add text to your form
Images - Upload images from your computer to insert
Question Blocks - Add yes/no questions, free response (for long answers) or short answer questions, dropdown menus, checkboxes, or date select blocks
Code Block - Insert different elements into your form using code (Check out this blog post where we list cool things you insert into your forms using the code block)
Package - Easily insert existing packages you’ve already created or edit those packages in your forms for clients to select
File Uploader - Allow clients to upload files directly to the form
Project Tracking - Insert a dropdown menu that allows clients to select where they heard about you using the existing project sources you’ve created in your account
Unless you’re building a public proposal (meaning people can access your proposal, select their packages, fill out their information, sign the contract and pay without needing to fill out a lead capture form or communicate with you), then you probably won’t be using the sections for short/answer, free response, and the other options for more questionnaire-style sections.
INSERT YOUR HEADER
If you created a header graphic for your proposal, you would drop your image block first, and upload your header image. While you’re at it, you can go ahead and upload all of the graphics you’ll be using at once, and then just select your header one.
ADD TEXT
From there, we’d recommend adding some text that states who the proposal is for and the date. The reason we’d add this as a text box instead of putting this on the header graphic is because you can use smart fields that will automatically generate the client’s name in that spot depending on who you’re sending it to, as well as whatever day it is when you send it off, so you don’t have to keep editing those things in a graphic, reuploading, and all that jazz.
WELCOME SECTION
Next, introduce yourself! Include a headshot of yourself and welcome them to the proposal. Flatter the client and get them excited about working with you on the project. We said this before, but we just want to reiterate that once you apply a proposal to a project, it can be edited individually from within the project. This means that you don’t have to edit your main template or duplicate it for each client. So, if you want to keep this language more general or give yourself a guide to go off of to use whenever it comes time to edit it specifically for a client, feel free.
You could add a section for “As seen in” and show the logos of places you may have press features. This is optional, of course, if you don’t have any features. If you have a portfolio of things you’ve worked on in the past, you could also add them in a “Recent projects” or “Past work” section. This would work best with images that you could drop inside of columns.
PACKAGES
You can start to lead into your packages now. If you have a section heading for your packages, you can add that image(s) in there. If you want to lay out your packages side by side, you would use Dubsado’s Columns section first. Then you can choose the number of columns you’d need (usually three for your three packages), then just drag and drop the packages section inside each of the columns. From there, you’d choose which package you want to display in the dropdown menu, and voila! If for some reason you want to edit the description and line items that display, you can do that here as well.
OPTIONAL ADD-ONS
If you offer a la carte services or tiny packages, you can list those as optional add-ons. These would also be in the form of packages in Dubsado that you’d insert into your proposal the same way as your larger packages.
TESTIMONIALS
Insert a testimonial under your packages to give that extra reassurance that your clients are making the right decision by working with you. This would be an image block in Dubsado if your testimonial is a graphic.
YOUR PROCESS
If you want, you can share a little bit about your process of working. Are there usually steps that you follow when completing a project? We include a graphic for this in our proposal template.
NEXT STEPS & FAQ
The next steps section is a crucial part of the overall client experience. It’s important to make sure your clients feel in-the-loop and always know what to expect next. Let them know that their contract is coming up next and then their invoice, if that’s how you have it set up in Dubsado. Whatever the next steps of onboarding look like for them, that’s what you’ll list here.
We’d also recommend adding an FAQ section to go ahead and answer some of those common questions you get asked to prevent your clients from asking again. (Although there are always those few that end up asking anyway.)
If this is a public proposal, you would also need boxes to gather the client’s information, which would usually go after the next steps and FAQ.
FINAL DETAILS AND FOOTER
We’re almost to the finish line! All that’s left to do is add another text box with any final details they need to know or just thanking them/expressing how excited you are to work with them. Lastly, close it off with your footer graphic, and you’re done!
Here’s what your proposal could look like if using our Dubsado Proposal Template in The Shop:

And that’s it! Your proposal is all built and ready to get sent to clients. Having a branded and beautiful proposal is such a powerful way to really wow your clients and make it an experience for them. Before you know it, you’ll be getting referrals out the wazoo!
If multiple templates catch your eye, we highly recommend joining The Co-op for $47/month. Not only will you unlock unlimited downloads to every single template, but you’ll also get access to the Co-op community and our private podcast called The Nugget where we drop the strategy and purpose behind the designs every single month.
